Users can easily add documents, folders, and custom objects to an object store using entry templates. Entry templates also make it easy to define approval workflows for these objects. For example, a manufacturing company’s template designer can create a set of entry templates for the various types of engineering specifications that are managed in the object store. The entry templates in this example predefine the document class, all property values except the document title, the access rights, and an approval workflow. When using the entry template to add a document to the object store, a user interacts with a wizard, which decreases the chance of invalid data entry by limiting the number of steps required and providing a more controlled entry process. Entry templates are created in Workplace, typically by a relatively small set of users, and are used by a much larger number of users. Some of the key capabilities of entry templates and advantages to using them are as follows:
Documents, folders, form data, and custom objects can be created with entry templates.
Documents, folders, form data, and custom objects can be created with entry templates.
- Users who are not administrators can create entry templates. For example, a project manager can create the entry templates used by her project team.
- Entry templates support FileNet P8 records management by providing a simplified and customizable method of declaring a document as a record.
- Entry templates can specify the folder in which the object will be filed, can either prevent or allow the user to change the folder, and can restrict the user to selecting a particular folder or its subfolders.
- Default property values can be specified in an entry template, and the template designer can elect to show or hide each property to users of the template.
- Entry templates can specify whether a document should be added as a major or minor version and can specify whether a user can change this setting.
- Entry templates can be set up to automatically classify the document based on its content.
- Entry templates can specify the access rights for the object, and the designer can elect to hide or show the access rights for the user to modify.
- Entry templates can serve as placeholders for documents that a user provides while processing a workflow step. When the user clicks on the entry template in the Workplace step processor, the entry template wizard prompts the user to add a document and the new document replaces the entry template attachment.
- Entry templates support specifying a workflow that will be launched when the user creates an object with the template, whether the workflow is a simple approval workflow that is defined in the entry template wizard or any other workflow created using Process Designer. For workflows created using the entry template wizard, the user can choose from a workflow with three steps—review, approve, and publish—or one with multiple, sequential approval steps. The template designer can specify the participants in advance, or let the user do so when using the template.
Entry templates make it easy for users to add documents, folders and custom objects to an object store. Entry templates also make it easy to define approval workflows for these objects.
- Below are the steps to create a Entry Template.
- Steps :
- 1. Go to Workplace XT --> Advanced Tools --> Entry Templates --> Add
- 2. Select Document Entry Template or Folder Entry Template
- 3. Select Object Store and Folder (define the destination path where the new object is added )
- 4. (Optional)


- To permit users to change the location when adding an object, select Show Select Folder step. This option is selected by default.
- To prevent users from changing the location, select Hide Select Folder step.
- 5. Click on Next
- 6. Select Class
- 7. Optional: Click Order Class properties to change the order in which the properties are displayed in the entry template.
- 8. Select the Required check box next to the property name if the user must enter a value for a property.
- 9. In the Default Value field, type any preset value.
- 10. Select the Access Level for each property. The access level determines what the end user can do with a property when adding an object
- Editable Allows the user to edit the property value
- Read Only Displays the property and value, but the value cannot be changed.
- Hide Does not display the property
- Hide/Editable Does not display the property, but the value can be changed pro-grammatically
- 11. Specify whether to add the object a compound document.
- 12. Specify whether to add the object as a major version.
- 13. Specify whether to allow users to add documents with the same file name. The Allow duplicate names setting is only supported on Workplace XT
- 14. Specify whether users see the properties when adding a new object.
- To permit users to view or change the preset property values, select Show Set Properties step. This option is selected by default
- To hide all the property names and values, select Hide Set Properties step. Do not choose this option if you marked any properties as required and didn't set a default value
- 15. Click on Next.
- 16. Add Users and Groups(Who can access Entry Template).
- 17. Click on Next and Select Work flow, properties.
- 18. Click on Next.
- 19. Select Folder (Where you store the Entry Template) and Click on NEXT
- 12. Add Entry Template Name
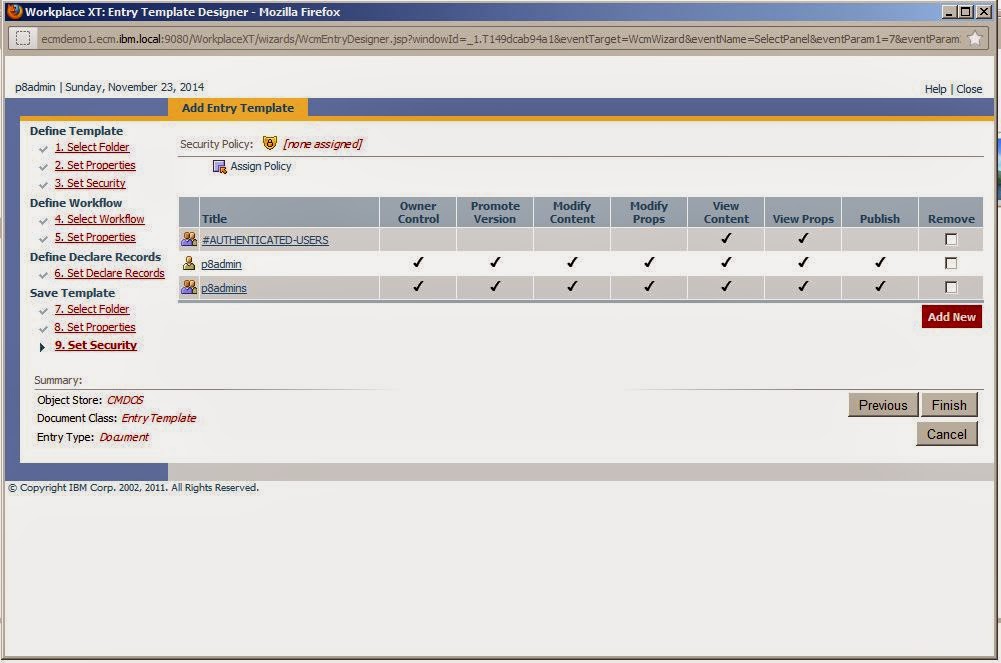
- 13. Add (Set Security) Users and Groups (Who can Modify the Entry Template)
- 14. Click on Finish
- ******Entry Template Created*********


Thank very much! Definitely your post is good and full of information.
ReplyDeleteReport template design
There is no Next button available when Hide Select Folder step radio button is selected and no folder is selected. Any thoughts. How to proceed in this case without giving any folder name and selecting only the objectstore. Thanks.
ReplyDelete